This article provides sample scripts for building and orchestrating a data pipeline in Teradata Vantage™ using Airbyte, Dagster, and dbt. The scripts demonstrate how to easily extract data from a source into Vantage with Airbyte, perform necessary transformations using dbt, and seamlessly orchestrate the entire pipeline with Dagster. While it doesn't delve into specific datasets or transformations, it highlights the powerful combination of these tools with Vantage, simplifying setup and accelerating progress.
Infrastructure layout
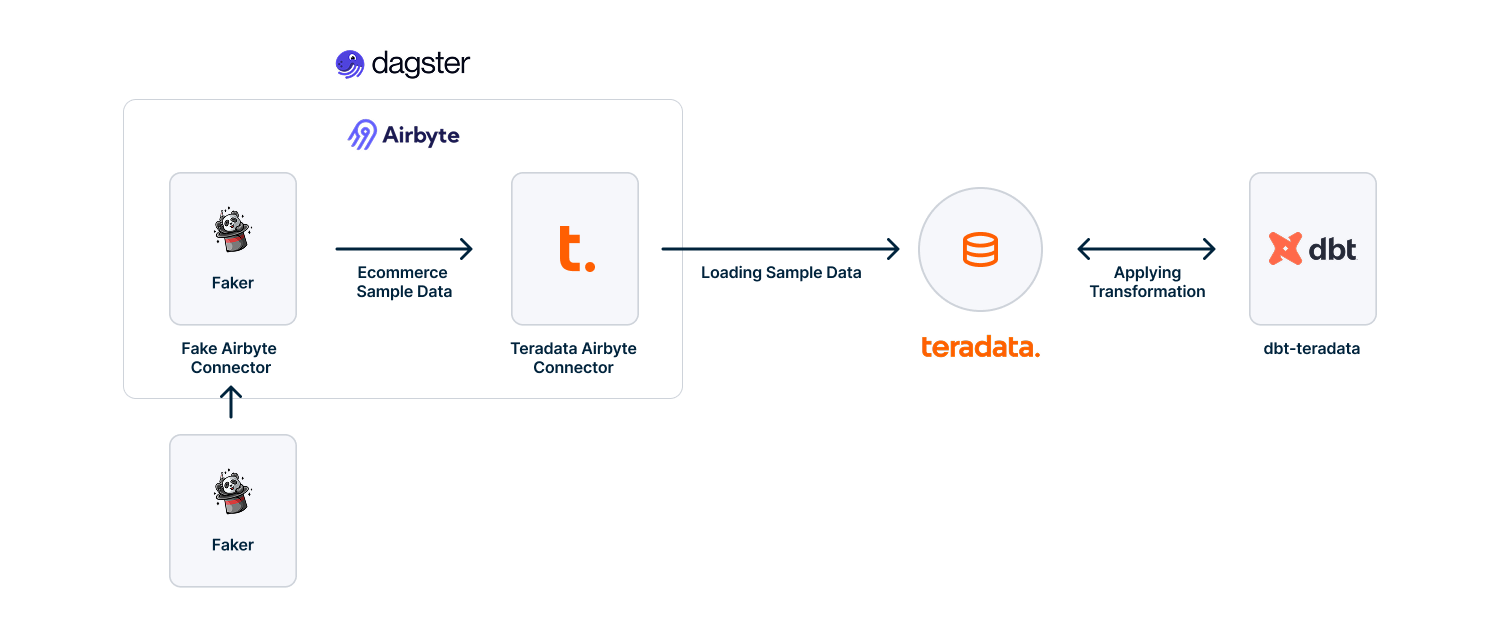
Diagram illustrating the data flow between each component of the infrastructure
Prerequisites
Before you embark on this integration, ensure you have the following set up:
- Access to a Vantage instance: If you need a test instance of Vantage, you can provision one for free
- Python 3.10 or later: If not installed, download, and install it from Python’s website
- Airbyte: A self-hosted Airbyte deployment using the open-source version; refer to the QuickStart guide for instructions
Setting up data extraction with Airbyte
Setting a source connection
You can initiate a new connection workflow on Airbyte’s Connections dashboard by either selecting Create your first connection or using the option in the top right corner.
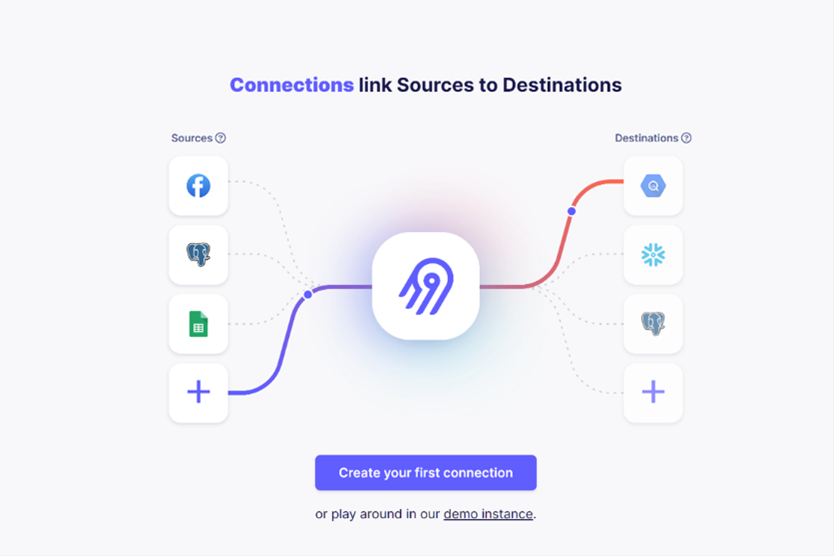
A screenshot showing Airbyte server started successfully
Airbyte will prompt you to choose a source.
You can select an existing source (if previously set up) or configure a new one. In this case, we select Sample Data (Faker).
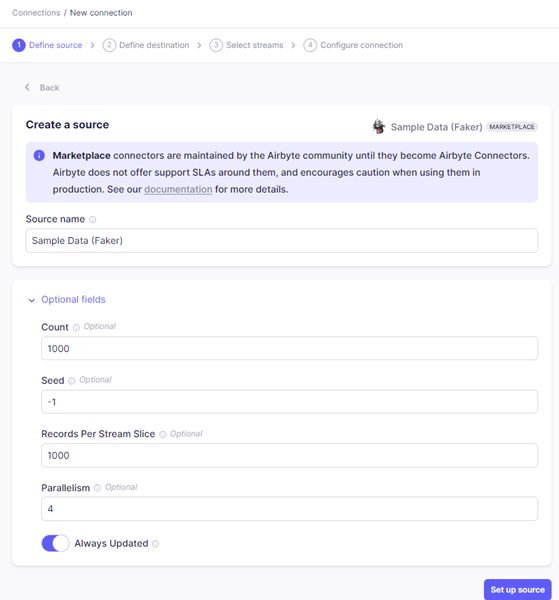
A screenshot of Airbyte's new source connection with Sample Data (Faker)
Setting a destination connection:
To create a new connection with Vantage, select Vantage as the destination type in the Set up the destination section. Enter the host, user, and password, which are the same as those used by your Vantage instance (or ClearScape Analytics™ environment).
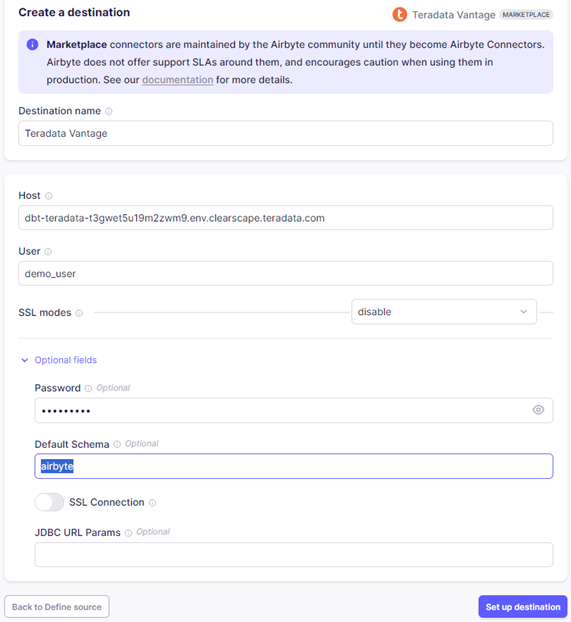
A screenshot of the Airbyte new destination connection with Teradata Vantage
Provide a default schema name appropriate to your specific context. In this example, we have used airbyte.
Take note of this schema name. In Vantage, this refers to a database name, which you will need to configure your dbt project.

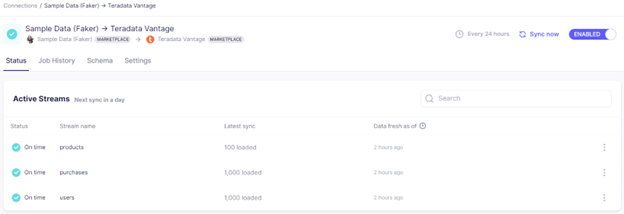
The tables, products, purchases, and users, are the primary entities being synced from the source Sample Data (Faker) to the destination Teradata Vantage.
Setting sample repository for this project
For convenience, we have created the repository with the following contents:
- dbt_project: Contains the dbt project
- Orchestration: Includes the Dagster-related files
- README.md: Provides an overview and instructions
- setup.py: Lists the packages required for this repository
You can get the project up and running on your local machine by following these steps:
- Clone the sample project repository:
git clone https://github.com/teradata/airbyte_dbt_dagster_teradata - Navigate to the project’s directory:
cd airbyte_dbt_dagster_teradata - Set up a virtual environment:
- For Linux or Mac:
python3 -m venv venv

source venv/bin/activate - For Windows:
python -m venv venv

		.\venv\Scripts\activate
- For Linux or Mac:
- Install dependencies:
pip install -e ".[dev]"This will install below pip modules:
- dbt-teradata==1.8.0
- dbt-core
- dagster==1.7.9
- dagster-webserver==1.7.9
- dagster-dbt==0.23.9
- dagster-airbyte==0.23.9
Setting up the dbt project
dbt (data build tool) allows you to transform your data by writing, documenting, and executing SQL workflows. The sample dbt project included converts raw data from an app database into a dimensional model, preparing customer and purchase data for analytics.
The data pipeline is composed of multiple stages, beginning with the ingestion of raw data through Airbyte. The _airbyte_raw_users table stores unprocessed user data in JSON format, the _airbyte_raw_products table contains raw product data in JSON, and the _airbyte_raw_purchases table holds raw purchase transaction details.
From these raw data sources, several staging tables are generated: stg_customers, stg_products, and stg_purchases. These tables hold cleaned and structured data on customers, products, and transactions, respectively, which supports analysis and reporting. The customer_demographics table summarizes customer data such as age and nationality, facilitating demographic analysis and targeted marketing efforts. The product_popularity table aggregates data on product purchase frequency, delivering insights into product demand to inform inventory and marketing strategies. Finally, the purchase_patterns table examines customer purchase behavior over time, aiding in understanding buying trends and optimizing the customer journey.
The details of the SQL transformations are out of scope for this article but can be derived from the accompanying dbt project repository.
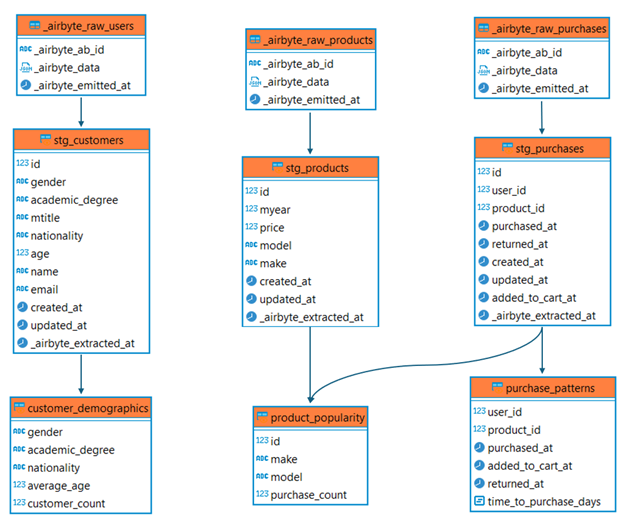
Tables and their columns being used in this sample project
Setting up the dbt project requires a series of steps as follows:
- Navigate to the dbt project directory. Change to the directory containing the dbt configuration:
cd dbt_project


	├───models

	│   └───ecommerce

	│       ├───aggregate

	│       │       customer_demographics.sql

	│       │       product_popularity.sql

	│       │       purchase_patterns.sql

	│       │       schema.yml

	│       │

	│       ├───sources

	│       │       airbyte_sources.yml

	│       │

	│       └───staging

	│               schema.yml

	│               stg_customers.sql

	│               stg_products.sql

	│               stg_purchases.sql
The `dbt_project` is the root directory of your dbt project. It has the following structure:
models: Contains all the SQL files and configurations that define your dbt models. These are the core of your project, where you write SQL to transform raw data into an analytics-friendly format.

	    ecommerce: This subdirectory is specific to the ecommerce domain of your project.

	        aggregate: Contains SQL files for aggregate models, which summarize or aggregate data for analytics.

	            `customer_demographics.sql`: Model for transforming customer demographic data.

	            `product_popularity.sql`: Model for calculating product popularity.

	            `purchase_patterns.sql`: Model for analyzing purchase patterns.

	            `schema.yml`: YAML file defining metadata, tests, and descriptions for the models in this directory.

	sources: Contains source configuration files for the raw data sources.

	            `airbyte_sources.yml`: YAML file defining the source configurations, such as Airbyte sources.

	staging: Contains staging models that handle the initial transformation of raw data into a cleaned, standardized format.

	            `schema.yml`: YAML file defining metadata, tests, and descriptions for the staging models.

	            `stg_customers.sql`: Staging model for transforming raw customer data.

	            `stg_products.sql`: Staging model for transforming raw product data.

`stg_purchases.sql`: Staging model for transforming raw purchase data. - Update connection details. You will find a
profiles.ymlfile within the root directory. This file contains the configurations for dbt to connect to Vantage. Update this file with your connection details, such as your database credentials and schema. Ensure that the schema specified here matches the schema mentioned in the Airbyte Teradata Vantage destination connector configuration. - Defining the sources for the project. To link sources in dbt with the assets in Airbyte, you can use the following configuration in the
airbyte_sources.ymlfile located in themodels/ecommerce/sourcesdirectory:sources:
- name: airbyte
tables:
- name: _airbyte_raw_users
meta:
dagster:
asset_key: ["users"] - Test the connection. Once you have updated the connection details, you can test the connection to your Vantage instance using:
If everything is set up correctly, this command should report a successful connection to Vantage.dbt debug
Pipeline orchestration with Dagster
Dagster provides a powerful platform for orchestrating data pipelines, making it easy to schedule and manage complex workflows. It enables data ingestion with tools like Airbyte and supports data transformations through dbt. Dagster’s unified approach allows you to automate these tasks, ensuring efficient, seamless pipeline execution. With Dagster, you can easily manage diverse data operations across your ecosystem. Dagster’s asset definition approach can manage dbt at the level of individual models. This enables you to:
- Execute specific subsets of dbt models, seeds, and snapshots using Dagster's UI or APIs
- Track failures, logs, and run history for individual dbt components
- Set up dependencies between dbt models and other data assets—for example, you can ensure dbt models run after data is ingested or schedule a machine learning model to run following the completion of the dbt models it depends on
The orchestration directory contains Dagster-related files generated when a dbt project is loaded into Dagster using the command below. We have also customized the code to incorporate the Airbyte assets.
└───orchestration

    │   pyproject.toml

    │   setup.py

    │

    └───orchestration

            assets.py

            constants.py

            definitions.py

            schedules.py

            __init__.py
Dagster project directory structure:
- pyproject.toml: This file is used for managing project metadata and dependencies. It specifies the configuration for the Python project, including details about dependencies, build settings, and project requirements.
- setup.py: This script is used for packaging and installing the project. It typically includes metadata about the project, such as its name, version, and dependencies.
- orchestration: This directory contains the Dagster-related files, which are used to define and manage data pipelines and assets.
- assets.py: This file defines Dagster assets, which represent the outputs of computations or transformations in your data pipeline. Assets are central to Dagster's data management and orchestration.
- constants.py: This file contains constant values used throughout your Dagster project. It helps maintain consistency and manage configuration settings.
- definitions.py: This file includes the definitions of Dagster jobs, pipelines, and other pipeline components. It outlines how different assets and computations are linked and executed.
- schedules.py: This file defines the schedules for running Dagster jobs. It specifies when and how frequently the jobs should be executed.
- __init__.py: This file is used to mark the orchestration directory as a Python package. It can also include initialization code for the package.
Integration of Airbyte and dbt assets into Dagster
1. Setup and configuration
Configure dbt as a Dagster resource
The file constants.py is responsible for configuring the DbtCliResource, which is used to interact with the dbt CLI.
It determines the path to the dbt project and the location of the manifest.json file, which is crucial for defining dbt assets in Dagster. The first time a pipeline runs, the manifest doesn’t exist yet, this is managed by the environment variable DAGSTER_DBT_PARSE_PROJECT_ON_LOAD as detailed in the code and explanation below.
import os

from pathlib import Path

from dagster_dbt import DbtCliResource


# Resolve the path to the dbt project directory

dbt_project_dir = Path(__file__).joinpath("..", "..", "..", "dbt_project").resolve()

dbt = DbtCliResource(project_dir=os.fspath(dbt_project_dir))


# Determine the path to the manifest.json file

# If it doesn’t exist, a parse is run, through the dbt cli to generate the manifest.

if os.getenv("DAGSTER_DBT_PARSE_PROJECT_ON_LOAD"):

    dbt_parse_invocation = dbt.cli(["parse"], manifest={}).wait()

    dbt_manifest_path = dbt_parse_invocation.target_path.joinpath("manifest.json")

else:

    dbt_manifest_path = dbt_project_dir.joinpath("target", "manifest.json")


# Airbyte configuration settings

AIRBYTE_CONFIG = {

    "host": os.environ.get("AIRBYTE_HOST", "localhost"),

    "port": os.environ.get("AIRBYTE_PORT", "8000"),

    "username": "airbyte",

    "password": "password",

}
Configure Airbyte as a Dagster resource
As mentioned, the file constants.py configures the connection parameters for Airbyte, including host, port, username, and password. These settings are used to create an instance of AirbyteResource later in the project.
AIRBYTE_CONNECTION_ID = os.environ.get("AIRBYTE_CONNECTION_ID", "<connection_id>")

AIRBYTE_CONFIG = {

    "host": os.environ.get("AIRBYTE_HOST", "localhost"),

    "port": os.environ.get("AIRBYTE_PORT", "8000"),

    "username": "airbyte",

    "password": "password",

}
To provide the connection_id of an Airbyte connection, you can either set an environment variable with AIRBYTE_CONNECTION_ID or directly pass the connection ID in constants.py
On the connection page, from the URL, copy the part between connections and status. It is the value of connection_id variable.

A screenshot showing how we can get the connection_id
2. Defining Dagster assets
Airbyte assets
The file assets.py defines how Dagster interacts with Airbyte and dbt. It initializes an AirbyteResource with the configuration settings defined above and uses load_assets_from_airbyte_instance to load assets from Airbyte into Dagster.
from dagster import AssetExecutionContext
from dagster_dbt import DbtCliResource, dbt_assets
from dagster_airbyte import AirbyteResource, load_assets_from_airbyte_instance
from .constants import dbt_manifest_path, AIRBYTE_CONFIG
# Define dbt assets for Dagster
def dbt_project_dbt_assets(context: AssetExecutionContext, dbt: DbtCliResource):
yield from dbt.cli(["build"], context=context).stream()
# Create an instance of AirbyteResource with the configured settings
airbyte_instance = AirbyteResource(
host=AIRBYTE_CONFIG["host"],
port=AIRBYTE_CONFIG["port"],
username=AIRBYTE_CONFIG["username"],
password=AIRBYTE_CONFIG["password"],
)
# Load assets from Airbyte into Dagster
airbyte_assets = load_assets_from_airbyte_instance(airbyte_instance)
dbt Assets
The file assets.py also defines how dbt assets are created and managed within Dagster. Use the @dbt_assets decorator to integrate dbt models into Dagster's asset management system.
@dbt_assets(manifest=dbt_manifest_path)

def dbt_project_dbt_assets(context: AssetExecutionContext, dbt: DbtCliResource):

    yield from dbt.cli(["build"], context=context).stream()
By following this approach, the provided files configure the interactions between Dagster, dbt, and Airbyte. This setup ensures that dbt models and Airbyte assets are properly integrated as Dagster's data-pipeline orchestration, enabling efficient data transformation and management.
Running the pipeline
Navigate to the orchestration directory
cd ../orchestration
Launch the Dagster UI
To start Dagster's UI, run the following:
DAGSTER_DBT_PARSE_PROJECT_ON_LOAD=1 dagster dev
Which will result in output similar to:
Serving dagster-webserver on http://127.0.0.1:3000 in process 70635
Note: DAGSTER_DBT_PARSE_PROJECT_ON_LOAD is an environment variable. If using Microsoft PowerShell, set it before running dagster dev using this syntax:
$env:DAGSTER_DBT_PARSE_PROJECT_ON_LOAD = "1"; dagster dev
Access Dagster in your browser:
Open your browser and navigate to:
http://127.0.0.1:3000
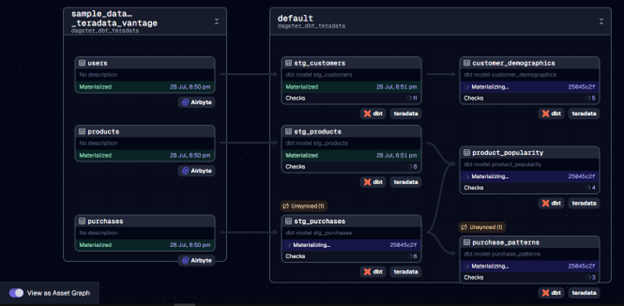
A screenshot of the Dagster web UI displaying the pipeline and the relationships between its assets
Here, you should see assets for both Airbyte and dbt-teradata. To get an overview of how these assets interrelate, select View global asset lineage. This will give you a clear picture of the data lineage, visualizing how data flows between the tools.
Select Materialize to execute the pipeline. In the pop-up window, select View to see the details of the pipeline run.
Monitor the run
The Dagster UI allows you to visualize the pipeline’s progress, view logs, and inspect the status of each step. You can switch between different views to see the execution logs and metadata for each asset.
Next steps
The real beauty of this integration is its extensibility. Whether you want to add more data sources, integrate additional tools, or enhance your transformation logic, the sky is the limit for extending and refining your data processes.
References
To learn more, feel free to explore:
