
Workflow orchestration is a key architectural concern in data engineering. Tools as simple as the Cron scheduler in Unix-like operating systems, such as Linux, can be used for simple workflows. However, Cron jobs might be laborious to implement when the intention is the orchestration of a complex workflow.
For these more complex workflows, Apache Airflow is a commonly used orchestration tool. As part of Teradata’s efforts to provide integration tools to our developer community, we've developed a provider, which allows the querying of Teradata Vantage™ databases from Airflow workflows.
Airflow and the Airflow Teradata provider
“Airflow is an open-source platform for developing, scheduling, and monitoring batch-oriented workflows”. An Airflow workflow is a sequence of operations, defined programmatically from start to finish with consideration of the dependencies between the involved operations. In the context of data engineering, Airflow allows users to programmatically define, schedule, and monitor data pipelines using Python.
The key concept of Airflow is the definition of workflows as code. The key abstraction included in Airflow workflows is the directed acyclic graph (DAG). A DAG allows the orchestration of tasks with clear reference to their dependencies and order of execution.
Airflow communicates with external systems and tools through external packages called providers. The Airflow Teradata provider enables the integration of Airflow with Vantage. The Teradata provider implements hooks and operators that allow users to seamlessly run Teradata SQL scripts for data definition, data manipulation, querying of data, and execution of stored procedures from within Airflow workflows.
Example project
The example project illustrates the orchestration of a data pipeline with Airflow and the Airflow Teradata provider. The example workflow consists of a DAG that includes both data definition and data manipulation statements, and the creation and execution of Teradata stored procedures.
The example project consists of three general steps:
- Installation and launch of Airflow
- Configuration of a Teradata connection in Airflow
- Data pipeline definition through an Airflow DAG using the Teradata provider
Note: Airflow is supported on Linux, Mac, and Windows WSL. To follow the example, you need access to a system with a Linux distro, macOS, or the Windows Subsystem for Linux (WSL) utility installed. On Windows, all code below should be executed in the context of the WSL utility.
Prerequisites
- A Vantage instance: Get one for free at ClearScape Analytics™ Experience
- Python 3.8/3.9/3.10/3.11
Step 1: Installation and launch of Airflow
Airflow is a Python package, and it’s installed and managed as any other Python package.
- Create and activate a Python virtual environment.
python3 -m venv airflow-env

source airflow-env/bin/activate
- Set Airflow Home. It is recommended to set the default working directory of Airflow as `~/airflow`.
export AIRFLOW_HOME=~/airflow
- Install Airflow with pip.
- To ensure the development environment's compatibility with the necessary providers, we must set some environment variables, including one pointing to a constraints file. These environment variables take care of managing the versioning of the needed packages.
AIRFLOW_VERSION=2.9.0


PYTHON_VERSION= " $(python3 --version | cut -d " " -f 2 | cut -d "." -f 1-2)"


CONSTRAINT_URL= "https://raw.githubusercontent.com/apache/airflow/constraints- ${AIRFLOW_VERSION}/constraints-${PYTHON_VERSION}.txt"


pip install "apache-airflow==${AIRFLOW_VERSION}" --constraint "${CONSTRAINT_URL}"
- Install Airflow Teradata provider.
pip install apache-airflow-providers-teradata
- Run Airflow standalone. Run below commands on terminal.
export AIRFLOW__CORE__LOAD_EXAMPLES=false

airflow standalone
- The environment variable will clean other Airflow samples, so we worked specifically with our sample scenario.
- The terminal screen will show a message notifying you that Airflow is ready. Just below you will find the password to log in to the Airflow console. Take note of that password.

Airflow console credentials displayed in the console logs.
- Access the Airflow UI.
- Visit http://localhost:8080 and log in with the admin account details shown in the terminal.
- Make sure your local host connection is under the http:// prefix and not https://.
- The username to log in to the Airflow console is `admin` by default. The password is found in the terminal logs, as mentioned above.
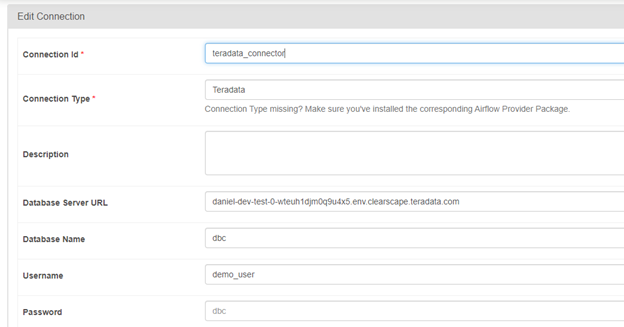
Step 2: Configure a Teradata connection in Airflow
In the Airflow UI:
- Select Connections under the admin menu.
- Select the + sign to create a new connection.
- Provide the required configuration details for the Teradata connection.
- Connection id: Unique ID for the Teradata connection—in this example, `teradata_connector`.
- Connection Type: From the drop-down, choose Teradata.
- Database Server URL (required): Teradata instance hostname—in our example, the host of URI provided by ClearScape Analytics Experience.
- Database (optional): Database that the connection will use by default.
- Login (required): The username used by the connection.
- Password (required): The password used by the connection.
- Select Save.
Step 3: Sample data pipeline orchestration with Airflow using the Teradata provider
As mentioned, Airflow workflows are Python files that define a DAG data structure through the Airflow DAG object. An Airflow DAG, in its most basic form, holds the DAG metadata definition (DAG ID, start date, schedule, etc.) set when the DAG object is initialized, a set of tasks, and the tasks execution sequence.
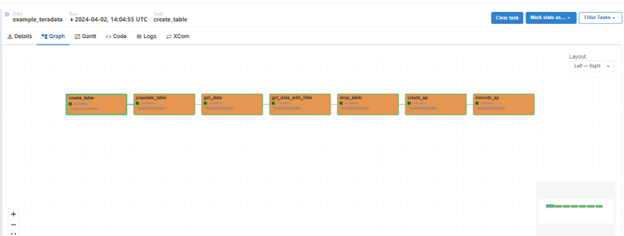
In our example, we define the following tasks, all provided by the Teradata operator.
- Create a table
- Insert sample data into the table
- Retrieve data from the table
- Retrieve data from the table by applying a WHERE clause
- Drop the table
- Create and execute a stored procedure
Setting the example DAG:
- Under the directory defined as `AIRFLOW_HOME` in your Airflow installation, create a directory named `dags`
- Under the `dags` directory, create a Python file—in this case, with the name `example_teradata_pipeline.py`
- Paste the content below to your newly created Python file
"""

Example use of Teradata operator.

"""


from __future__ import annotations

import datetime

from airflow import DAG

from airflow.providers.teradata.operators.teradata import TeradataOperator


DAG_ID = "example_teradata"

CONN_ID = "teradata_connector"


with DAG(

dag_id=DAG_ID,

start_date=datetime.datetime(2024, 2, 2),

schedule="@once",

catchup=False,

default_args={"conn_id": CONN_ID},

) as dag:


create_table = TeradataOperator(

task_id="create_table",

sql=r"""

CREATE TABLE Users, FALLBACK (

username varchar(50),

description varchar(256)

);

""",

)


populate_table = TeradataOperator(

task_id="populate_table",

sql=r"""

INSERT INTO Users (username, description)

VALUES ( 'Danny', 'Musician');

INSERT INTO Users (username, description)

VALUES ( 'Simone', 'Chef');

INSERT INTO Users (username, description)

VALUES ( 'Lily', 'Florist');

INSERT INTO Users (username, description)

VALUES ( 'Tim', 'Pet shop owner');

""",

)


get_data = TeradataOperator(

task_id="get_data",

sql=r"""

SELECT * FROM Users;

""",

)


get_data_with_filter = TeradataOperator(

task_id="get_data_with_filter",

sql=r"""

SELECT * FROM Users WHERE {{ params.column }}='{{ params.value }}';

""",

params= {"column": "username", "value": "Danny"},

)


drop_table = TeradataOperator(

task_id="drop_table",

sql=r"""

DROP TABLE Users;

""",

)


create_sp = TeradataOperator(

task_id="create_sp",

sql=r"""replace procedure example_sp(in p1 integer, inout p2 integer)

begin

set p2 = p1 + p2;

end;

""",

)


execute_sp = TeradataOperator(

task_id="execute_sp",

conn_id=CONN_ID,

sql ="CALL example_sp(2,2) ",

)


(

create_table

>> populate_table

>> get_data

>> get_data_with_filter

>> drop_table

>> create_sp

>> execute_sp

)
Running the DAG:
- Select DAGs in the menu, and you’ll see a list of DAGs
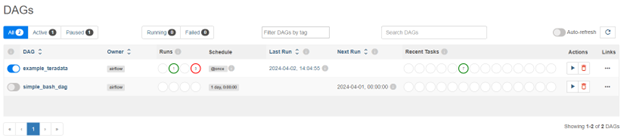
- If you don’t see your DAG, you might need to exit the server, refresh the list manually with `airflow list_dags`, and restart the server
- Select the play icon in your DAG
- Follow the execution by selecting the DAG ID to see the graph
- Rectangles in the graph represent the DAG’s tasks
- If a task fails, review the task logs by selecting the corresponding square and selecting logs in the menu
References
To learn more, check out: